Author Archives: Tom

Back in the Land of the One-eyed Bloggers

After a long while of struggling, this blog is now properly secured by SSL. This has been a major goal since returning from Banff and area, Alberta, in October.

Lots of goings on, lately: finished a job made up of a long series of small jobs for a client, got another new job like that for a local building supply store, setting up point-of-sale and inventory.

Working on a few iOS projects and very soon I hope to revisit android too.

There are so many things that go on, blogging about everything is a bad idea unless there is something useful and valuable to say.

So now I’ll say: take care of your eyes. Seriously. Unrelated, sure, but i was striken with a severe case of iritis this week. That is inflammation of the iris. It’s something making me more caring of my vision. Thinking of all those people with sight in only one eye, or fully blind, I am more compassionate to them and others suffering this Christmas season.

20111220-025109.jpg

This is just a pic of my eyes, one dilated with some drops. This is to attempt the breaking-away of, or prevention of, the lens becoming sticky and adhering to the iris. When such a thing does happen, cells can get pulled away from the iris and remain on the lens.


The following accurately depicted my sight on the worst of the days:
The sight from my left eye, with contact in, 20/20.

20111220-025913.jpg


The sight from either eye on any given day WITHOUT aid by contact or glasses

20111220-030026.jpg


The sight in my right eye, clouded and less sensitive to blue light so things become more yellow/orange in color

20111220-030150.jpg


When this is over, I will try to remember the pain and frustration, so the memory keeps me more proactive!

Leave a comment

Best Techniques for 360 Panorama on iPhone

360 Panorama is a revolutionary app.  It is made by Occipital (occipital.com) and has been under constant improvement, both the app and the web-site since it was released in late 2010.  Check out the 360Verse web app!

A short history of my use of the app:

I got the app in early December 2010, and captured several Christmas light panoramas.  They were amazing, and the ease at which I could just stand and spin around made me so happy.  Having experience stitching dozens and dozens of photos into 40-80 megapixel panoramas, this made me so happy to save such time. And for better or worse, I am a perfectionist.  Despite how amazing and excited these christmas light panoramas were, I found them flawed. All my attempts were challenged by light intensity, and were full of tilting, so I felt either I needed to figure out some techniques to improve, or the app needed updating or both. And the app has been updated several times with several new features, and greatly improved image blending/stitching! Awesome!


Getting a satisfying 360-degree photo is so easy (wahoo!!!), but to add that little extra bit of quality, I’ve come up with a handful of techniques that can be used to improve the finished result.

Quick Bonus Tips! 

  1. Keep the iPhone as close to you as possible, right in front of your face.  Holding it at arms length can confuse it for certain near-by objects.  This tip came directly from Occipital after I finally asked for help in late February 2011.
  2. Also don’t lower it down to your chest or waist when capturing the ground, and don’t stick it way up above your head when capturing the sky.  Only rotate it up and down, right in front of your face, and spin your body to get the side images.

The Best Tips

The following are the most important techniques to solve the most significant problems I found occurring in most panoramas:

  1. Achieving the best camera exposure levels in the first shot
  2. Moving around so the images to blend together properly, primarily to fix broken horizons
  3. Moving so the internal gyroscope does not start to go sideways, resulting in tilted-looking buildings like Leaning Tower of Pisa.. or the horizon on a lake doesn’t tilt.

1. Get Best Exposure for the Environment’s Light

Determining the best exposure is often a bit of a guess, but the best way to get it is aiming the camera toward the brightest point in the 360 environment for light or average environments … obviously the sun, if you’re outside, or some light wall inside, etc.  In a darker environment, aim the camera at the darkest place so it compensates and the rest of the 360 view is easier to see, not all black.  And then, start capturing, and quickly spin around and find any places in the environment that you really like and want to see in the panorama, and if they appear way too dark or too light, then you might want to restart, and aim the camera a bit off from whatever you aimed at initially.  Then you can either assume the camera has a good initial exposure and continue to make the panorama or you can do a quick spot check again.  I usually do one single test and then do the panorama.. Although, I would have done a third on Lake Louise if I had the time (I was annoying family members who were also in the canoe, requesting them to spin the boat around! haha..)

Here are two pairs of panoramas with separate light/dark versions, Lake Louise and Grotto Mountain Pond:

  • Lake Louise light (the water texture is much more detailed than the dark version, but the Fairmont Chateau Lake Louise is farther and harder to see here… the dark one is closer)


  • Lake Louise dark (the trees on the mountain are harder to see, and water is darker compared with the light version, but the two landmarks Mount Victoria and Chateau Lake Louise are easy to see)


  • Grotto Mountain Pond light (easy-to-see large mountain on left, almost bleached-white mountain on right)


  • Grotto Mountain Pond dark (easy-to-see mountain on right, almost total black mountain on left)

I felt rushed for time at Grotto Mountain Pond, so I couldn’t get a well balanced 3rd panorama.  .. Ahem.. Actually, these were the 3rd and 4th. The 1st and 2nd were each destroyed by separate incoming SMS text messages. Bah!! Airplane mode fixed that. hahaha!

This technique was important for the panorama in the field with mountains in Canmore (http://360.io/HkKLEB)  I did 2 or 3 spot checks before I finished the field-with-mountains, because there is a huge amount of dynamic range.

First I aimed at the sun, so the sky was darker and all the clouds were detailed, but the mountains turned totally black.

Then tried lighter a bit, once or twice, until I liked the balance between bright sky clouds and the dark mountains. This was used by Occipital in the 360verse, and a viewer commented on it, inspiring me to write all this information.


2. Preventing Broken Horizons


Watch the grid when starting, and try to get the horizon in your first image, rather than a total sky image or total ground image.  Then slowly angle the device up and down to get the sky and ground for this initial horizon image, then return to the horizon and start slowly turning around in a circle. The camera decides to take a picture when there is enough new uncaptured environment in the camera view.  When the camera decides to snap a new picture, try to make it so as much of the new image is overlapping the captured images as possible…. so spinning your body slower helps.  Doing this, will greatly reduce the chance of a broken horizon… except in the final stitch-together when you complete the 360 spin.  It’s much more tricky to get the horizon at the end of the 360 spin to be unbroken.  I think it’s a bit of luck, but it’s partly about keeping the iPhone as still as possible, while spinning.  But as I describe in #3 below, the internal gyroscope can get thrown off so sometimes.  Finally, completing the spin around, hopefully there has been very little broken horizons, and there are no trees or buildings or horizon tilted.  Then start spinning slowly again, capturing the sky and ground in the same manner.  I haven’t determined if it makes a difference to capture only the sky in a spin, and only the ground in another spin, or if the second spin can capture both sky and ground perfectly well simply angling up and down as you spin the second time around.

3. Calibrating the Gyroscope Mid-Capture

The fix for the gyroscope, as described above, is important to limit lines both horizontal (like the horizon especially obvious on lakes/oceans) or vertical (like buildings or trees) from tilting left/right.  It’s best, while keeping the iPhone perfectly untilted left or right, to watch the grid on the screen.  If it starts to tilt, then the gyroscope needs calibration.  So, the best way to do that without ruining the panorama is to keeping the iPhone pointed at an image you’ve already captured, and moving the device rapidly back and forth.  I have found various motions work at different times, either outward and inward around 12-24 inches out from your face, or moving the phone in a circle about 12 inches in diameter, or a figure-8 shape, in front of your face.  Alternatively, quickly spin a bit back over the panorama you’ve captured already about 90 degrees, then return and repeat as needed until the grid is straight again.  That is the best technique for calibrating, and at the same time preventing the camera from snapping a new picture for the panorama that you don’t intend.

Now I’ve created almost 30 panoramas, some uploaded and public, and feeling great confidence in the app, and my own improved use of it.  Hope this info can help you get even more enjoyment from the app.

If you want to see some more of mine, click to view my public panoramas occipital account page.

Follow @360panorama on Twitter to hear about the latest news and additions in the 360verse web app.

4 Comments

Make your iOS apps support public types (like .zip)

It will happen once in a while, when using an iPhone or iPad, a person may get an email with an attachment to be opened, but can’t because there is no app on the device to open it. Or similarly, surfing the web using the Safari mobile browser, and suddenly there is a file to be accessed/downloaded but it isn’t supported in Safari on iOS.

And for app creators/developers, we solve this issue by allowing our apps to open those types of files, to make up for the lack of Apple having an app that does so.

There is much info around the internet about this, but mostly the info is about supporting custom file types (for random example: .my3dimage) it all comes up short for supporting public file types. I mean, types of files that are out there in the world, but the iPhone doesn’t have an app that supports them. A really obvious case is PDF files.  They used to be not supported, but now they can be viewed in Mail or Safari.  One popular type that is not supported in mail or is the zip file type.

An app developer simply adds the CFBundleDocumentTypes key to the app’s Info.plist file, and fills it in with info, and then builds the app to handle the file when another app tries and fails to open a file.

CFBundleDocumentTypes is an Array of Dictionary objects. Each dictionary has a set of keys (and values) and following is a list of recommended keys from Registering the File Types Your App Supports in Document Interaction Programming Topics in the iOS developer library:

CFBundleTypeName specifies the name of the document type. (ie. Zip archive)
CFBundleTypeIconFiles is an array of filenames for the image resources to use as the document’s icon. (could be a picture of a folder with a zipper, like Windows Explorer uses, or anything else)
LSItemContentTypes contains an array of strings with the UTI types that represent the supported file types in this group. (an array of the UTI types.. this is the confusing part for quickly supporting public types that I deal with in a moment).
LSHandlerRank describes whether this application owns the document type or is merely able to open it. (This is another interesting part that I talk about)

More can be added (and SHOULD be added), and they’re found in Table 2 Keys for type-definition dictionaries, of the CFBundleDocumentTypes section, in the Core Foundation Keys page of iOS Information Property Key Reference.  But BEWARE!  Several of these keys are not for iOS, but Mac OSX, and some are deprecated, while still remaining in the list.

There is more information on the meaning of each specific value that can be assigned to each key. Check out below Table 2, in CFBundleDocumentTypes section, for Document Roles and Document Icons.

After Document Roles and Document Icons sub-sections, is a relatively section of some importance, Recommended Keys.  I say “some” importance because it’s a very important section naturally, but contains out-of-date recommendations.  This list contains 1 valid key for iOS and 3 that are Mac OSX only, plus those 3 are deprecated:

LSItemContentTypes
CFBundleTypeExtensions (not in iOS)
CFBundleTypeMIMETypes (not in iOS)
CFBundleTypeOSTypes (not in iOS)

The following are strongly recommended, but optional:

CFBundleTypeIconFile
CFBundleTypeName
CFBundleTypeRole

These 7 recommended keys, partly overlap with the 4 I listed above from the Registering the File Types Your App Supports section. The overlapping items are:

LSItemContentTypes
CFBundleTypeName

It can be confusing then, which to use… I think this is just a case of some instructions not being updated with the latest best-practices. So try support as many non-deprecated keys as possible!

Now for a list of the strings that can go into the all-important LSItemContentTypes section:

System-declared Uniform Type Identifiers (UTIs)


The table on this page lists a whole bunch of system and public file types that aren’t necessarily supported in the iPhone or iPad.  Zip is in the list, and happens to have the com.pkware.zip-archive valiue.

I won’t discuss the icon, but please see Document Icons  within Custom Icon and Image Creation Guidelines for info about them.

Info about the Role is in iOS library.

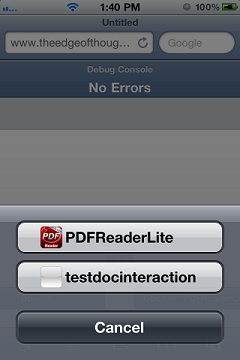
There is a possible issue with the Rank, if two apps declare themselves as the Owner of a type, then one of them is given precidence for the button that appears on the right-side in Mobile Safari, as seen in this picture:


I don’t know much about dealing with this yet, but it should not be a huge problem because a user can click on the “Open In..” button and see other apps that open it, like in the following picture:

Hope that helps someone.

2 Comments

Design updates on Google Calendar

Google Calendar’s visual design was updated recently.

The changes and reasons are explained here:
http://www.google.com/support/calendar/bin/answer.py?answer=1351806&&hl=en

I want to just point out some interesting part of that, the part that is always the most interesting/relevant to my own self:

Why we made these changes

The way people use and experience the web is evolving, and our goal is to give you a more seamless and consistent online experience — one that works no matter which Google product you’re using or what device you’re using it on. The new Google experience that we’re working toward is founded on three key design principles:

Focus: With the design changes in the coming weeks and months, we’re bringing forward the stuff that matters to you and getting all the other clutter out of your way.
Elasticity: The new design will soon allow you to seamlessly transition from your desktop computer to your mobile phone to your tablet, while keeping a consistent visual experience. We aim to bring you this flexibility without sacrificing style or usefulness.
Effortlessness: Our design philosophy is to combine power with simplicity. We want to keep our look simple and clean. But behind the seemingly simple design, the changes use new technologies to make sure you have all the power of the web behind you.

Here are some shrunk images that demonstrate the before-after differences:

Leave a comment

Google Android cheap devices

A friend and I walked by a Rogers Wireless reseller recently, and discussed a promotional poster we saw in the window. It showed a bunch of Android phones, and the cost for these was advertised around $80, brand new (on contract, of course… )

Soon, most or all North-American mobile phones will be smartphones. Android is free, and so manufacturers are not obligated to spend any money for including it on their devices. Except, in order to properly manufacture a phone that includes Android installed from the factory, the phones must have certain abilities/features.

As phone prices drop, perhaps the cost to include a touch-screen will become too great for the manufacturer (relative to the cost of the phone itself) and the manufacturer may choose to use a trackball or touchpad like the BlackBerry phones. The possibility of any major manufacturer producing any android phone without a touch screen is a very bad thought. It would wreck most apps, and make the experience of using the phone very terrible. Maybe then it would not matter if it had no touch screen, because no one would buy it!

So, it was a pleasant when I was looking for a list of permanently-available buttons (home, back, search, menu, volume, lock, etc) and I discovered the following, part of the Android Compatibility Definition Document, available in the side column at http://source.android.com/compatibility/index.html

7.2.3. Navigation keys
The Home, Menu and Back functions are essential to the Android navigation paradigm. Device implementations MUST make these functions available
to the user at all times, regardless of application state. These functions SHOULD be implemented via dedicated buttons. They MAY be implemented
using software, gestures, touch panel, etc., but if so they MUST be always accessible and not obscure or interfere with the available application display
area.
Device implementers SHOULD also provide a dedicated search key. Device implementers MAY also provide send and end keys for phone calls.

7.2.4. Touchscreen input
Device implementations:17
• MUST have a touchscreen
• MAY have either capacitive or resistive touchscreen
• MUST report the value of android.content.res.Configuration [Resources, 30] reflecting corresponding to the type of the specific
touchscreen on the device
• SHOULD support fully independently tracked pointers, if the touchscreen supports multiple pointers

7.2.4 says all Android phones MUST have a touch screen. That’s a great discovery! So the touchscreen part of an android phone is not optional.

That’s all for now.

Leave a comment

Businesses in Cahoots

Businesses will create joint ventures to improve products and market penetration.

A nearby town has a pair of businesses, side-by-side, that together inspire laughs or dread.
So what to think… Coincidence? Or a shady partnership?? I’ll let you draw your own conclusions.

(I saw this in-person years ago but couldn’t successfully get a digital camera photo, so this is from google Street View.)

Two businesses that no-one would want to see partnered together.

Leave a comment

Tablet screens: Playbook vs Galaxy Tab vs iPad

This is just a bit of technical numbers trivia.
I made these calculations to have a reference for comparing things.

Platform

BlackBerry
Playbook

Samsung
Galaxy Tab
Apple
iPad
Resolution
(pixels)
1024 x 600
1024 x 600
1024 x 768
Diagonal size
(pixels)
1186 diag
1186 diag
1280 diag
Diagonal size
(inches)
7"
7"
9.7"

pixels-per-inch
(dots per inch)

169 ppi/dpi
169 ppi/dpi
132ppi/dpi
App icon width (pixels)
90px
(90 x 90)
72px
(72 x 72)
72px
(72 x 72)
(divided by ppi)
169 ppi
169 ppi
132 ppi
App icon width
(inches)
0.53"
0.43"
0.55"
Leave a comment

A funny musical instrument

From DailyMotion.comThis is an instrument that is used in serious music productions, but funny by itself, makes me laugh out loud.

It’s known as a jaw harp, or Jew’s harp, or juice harp, or mouth harp, or ozark harp, or trump, or guimbarde. Yes, that many (probably more) various names for the instrument.

So how can it be taken seriously with so many names? How can it be taken seriously when it sounds so funny and is played basically by making a “twang-a-lang” sound inside your mouth?

But it makes for a good laugh. Oh, and I’ve personally owned a jaw harp for at least 15-20 years. But I gave up learning because I didn’t know how it was supposed to be played… sheesh.

http://www.dailymotion.com/video/x4qre7_solo-de-guimbarde_music

Leave a comment

Useful content vs entertaining content

There is a great conversation in the movie Morning Glory. It is a quick debate about the quality and value of news and information.
Are cold-hard facts more important than candy-coated trivia?

I’m considering a reorganization of this blog, and conversion into more of a discreet page format, rather than a huge blog page greeting any visitor.

First up: Converting the “About” page to a “Contact” page.

Leave a comment

BlackBerry vs iPhone (iOS): the fundamental UI “view”

Here’s some info for developers… Not so useful for a regular app user.  This will be an updated document/post!

There are usually counterparts in competitive things. Blackberry’s OS and iOS and Android, they all have common things that are simply changed a bit, most frequently by name, but maintaining a common set of traits, as I’m going to begin describing. There is much too much documentation on various things to do a comprehensive common comparison, unless I were getting paid to do such an article by someone who wanted it (which I’m open to doing for the right price!). The purpose of constructing this is to give a platform to launch a person into their own research and discovery.

The basic foundational user-interface concepts are what you see, and what you do with it.
The foundational “what you see” element is generally called the “view”. In iOS, this is called UIView and in BlackBerry, it is called Field. For the record, in Google Android, it is called View.
Temporary note: this is comparing BB and iOS, not including Android right now.
What foundational “what you do with it” element is generally a user action. In iOS, the most basic is a UITouch (and derivatives, like UIGestureRecognizer), and in BlackBerry, I think it’s called a trackballClick. Then there are more actions a user can do, like dragging… Sorry if this is too basic, just being well-rounded.

The specific web address for the documentation of each of the view elements are:
http://www.blackberry.com/developers/docs/3.6api/net/rim/device/api/ui/Field.html
http://developer.apple.com/library/ios/#documentation/uikit/reference/UIView_Class/UIView/UIView.html

BB iOS
Quick description (from official docs):
A field represents a rectangular region contained by a manager. The field sizes itself according to its needs in layout. The manager, rather than the contained fields, completely handles scrolling.
Quick description (from official docs):
The UIView class defines a rectangular area on the screen and the interfaces for managing the content in that area. At runtime, a view object handles the rendering of any content in its area and also handles any interactions with that content.
.isFocusable (UIResponder)canBecomeFirstResponder
.onFocus (UIResponderDelegate) becomeFirstResponder
.onUnFocus (UIResponderDelegate) resignFirstResponder
.layout(req) layoutSubviews
.paint(req) drawView
.invalidate setNeedsDisplay
.updateLayout setNeedsLayout
.trackwheelClick (UIResponder)touchesBegan:withEvent:
.trackwheelUnclick (UIResponder)touchesEnded:withEvent:
(UIResponder)touchesCancelled:withEvent:

Manager vs UIViewController
http://www.blackberry.com/developers/docs/3.6api/net/rim/device/api/ui/Manager.html
http://developer.apple.com/library/ios/#documentation/UIKit/Reference/UIViewController_Class/Reference/Reference.html

BB iOS
Quick description (from official docs):
The system uses manager objects to contain fields. The various manager subclasses handle specific kinds of field layout. This Manager class itself deals with scrolling internally.
Quick description (from official docs):
The UIViewController class provides the fundamental view-management model for iPhone applications. The basic view controller class supports the presentation of an associated view, support for managing modal views, and support for rotating views in response to device orientation changes
Relationship to Field: extended from Field class
Contains a bit of UIScrollView code for handling scrolling…
Relationship to Field: contains a UIView property ( .view)
Leave a comment